Import Templates and Instructions
Each type of import has its own template and requirements. This article covers imports that an account holder can set up and provides links from the support team. Below are the CSV templates required for each of these imports, along with links to additional resources and help.
Special characters (such as "&") can cause disruptions during import, and we recommend removing them before attempting to import.
Patron, Student, and Authentication imports can be performed by any account user with Full Admin permissions. Instructions for those imports can be found in their respective locations within Ludus and the manual.
Imports available on your admin account:
CSV Example:
Before you can upload, you will first want to organize your records into a CSV file or Excel sheet. Each bit of information (ID, email, first name, last name, grade) will need to be in its own column. Each row will represent an individual record. For more information about what bits of information are needed for an Authentication record, check out this article.
Suggested Article: What information is needed for an Authentication record?
To import Authentication:
Navigate to More --> Authentication from the top navigation bar.
Click Import.
Drag your file to the grey area or click the space to choose a file from your computer. Click Continue.
Use the drop-down boxes to make sure the columns match up to the desired import area (i.e., email to email and Auth ID to Auth ID).
Click Import.
Note - See Authentication for more information, including how to enable Authentication on your account. Import information is also provided in that resource.
CSV Example:
To import Patrons:
Navigate to Patrons --> Database from the top navigation bar.
Click Import
Drag your file to the grey area or click the space to choose a file from your computer. Click Continue.
Note - check out Import Patrons to Ludus for more detailed instructions/information.
Note: Check out Signup Patrons for a Mailing List Using Imports for how to use imports to update your mailing lists.
CSV Example:
To import Students:
Go to More (at the top of your account) -> Students.
Select the More Dropdown (on the students page) -> Select Import.
Note - Only the Student's first and last names are required upon import.
Note - Check out Students for more detailed instructions and background information on the Students feature.
CSV Example:
To import Volunteers:
Navigate to More (at the top of your account) -> Volunteers.
Once there, navigate again to Volunteers (located along the top bar).
From here, select Import Volunteers.
Note - You can also Import Volunteer Hours through Ludus support. Scroll further down this page for that information.
Imports that need to be done by Ludus Support:
CSV Sample:
To import Access Codes the following information can be included in the appropriate column of the CSV.
- Access code: (Required) Can be letters or numbers, and must be unique. Can not contain special characters.
- Reference Text: (Optional) Internal note for Admins that appears on the Access code screen.
- Total Tickets: (Optional) Used to set the total number of tickets a code can be used for.
- Showtimes: (Optional) Used to limit the code to unlocking a specific event time or times. Event time ID is obtained via the URL for the Event (using the New Order button to get to that URL). Multiple time codes would be separated by a comma. See the example below.
- Email: (Optional) If provided the Access code will be emailed to the address provided immediately on import.

Any column not used on the CSV should be deleted
Access codes will be set to individual/Family if the Total TIckets column is used.
Both Flat Rate discounts and Percentage Off discounts can be imported. Each type has its own CSV template.
Flat Rate Discount Template
For Flat Rate discounts, the following items can be set by import:
- Code (Required): Can be Letters, words, or numbers, or a combination of those. Must be unique, with no special characters or spaces.
- Flat Amount (Required): The amount of the discount.
- Flat Type(Required): This sets the discount to be either per Order or per Ticket.
- Total Available (Optional): This is the total inventory for the discount code and is not the per-patron limit. Set to 0 to not use this feature (this will "uncheck" that option in the interface)
- Tickets Limit (Optional): this is the total number of tickets the discount code can be used on. Set to 0 to not use this feature.
- Ticket limit Type (Optional): if 'tickets_limit' is set, you can set this to all or patron. Use 'all' if the discount code should expire after being used on that many tickets in total across all orders. Use 'patron' if it's a shared discount code amongst multiple patrons (per patron).
- Global (Optional): Set this discount code to be a global discount. Set to 1 to enable, leave as 0 or blank to not use.
- Global Shows (Optional): if global is set to 1, you can set the global events using their IDs, from the URL like this: '100073 100016 100023' <- each of those is an event ID, be sure to put a space between each ID (commas are not accepted)
Percentage Off Discount Code Template
Importing percentage off discount codes allows for using the following settings via import.
- Code (Required): Must be unique and not contain any spaces or special characters.
- Percentage (Required) The percentage to take off of ticket prices.
- Total Available (Optional): This is the total inventory of tickets for the discount code and is not a per-patron limit. Set to 0 to not use this feature.
- Tickets Limit (Optional): This is the total number of tickets the discount code can be used on. Set to 0 to not use this feature.
- Ticket limit Type (Optional): if 'tickets_limit' is set, you can set this to all or patron. Use 'all' if the discount code should expire after being used on that many tickets in total across all orders. Use 'patron' if it's a shared discount code amongst multiple patrons (per patron).
- Global (Optional): Set the discount code to be a global discount. Set to 1 to enable, leave as 0 or blank to not use.
- Global Shows (Optional): if global is set to 1, you can set the global events using their IDs, from the URL like this: '100073 100016 100023' <- each of those is an event ID, be sure to put a space between each ID (commas are not accepted)
It is important to know that not all settings for discount codes can be imported. Only settings listed above can be imported at this time.
It is possible to import historical donations. These will appear as comped donations. Donation Import Template:
Note - Patrons must be imported first, before importing historical donations.
Note - The format for the "submit date" column must be Year-Month-date (YYYY/MM/DD). If the year is the only date on the donation, import the donation in as 2025-01-01. It must have the formatting of a four-digit year, a two-digit month, and a two-digit day to import correctly.
To import donations, the following columns are available:
- Submit Date (Optional): The date of the original donation.
- Amount (Required): The amount of the donation
- Full Name (Required): The First and Last names of the patron can be entered
- Email (Required): The email address creates the record of donation.
- Street Address (Optional): Street Address for Patron Record
- City (Optional): For the Patron Record
- State (Optional): For the Patron Record
- Zip Code (Optional): For the Patron Record
- Phone number (Optional): For the Patron Record
- Company (Optional): For company-based donations.
- Memo (Optional): Short message about the donation that appears on the confirmation email.
- Category ID (Optional): If you have categories set, you can include the Category ID, listed on the Donation Categories page.
- Level ID (Optional): If using levels, you can enter the Level ID number (located in the URL when clicking Edit next to the level to assign the donation to your specific levels. See the example below.
Importing Flex passes can be done for many reasons. While normally used when onboarding to set up existing sales from your prior system for events that will take place on Ludus, you can also use them for other purposes, such as an alternative to discount codes, where they can be used for comp tickets.
Flex Passes must be set up within your account before an import can take place. When requesting an import, let us know if patrons should be emailed the passes or not. Flex Pass Import Template:
The following fields are utilized for Flex Pass imports:
- Pass ID (Required): Obtained via the Pass URL (example below)
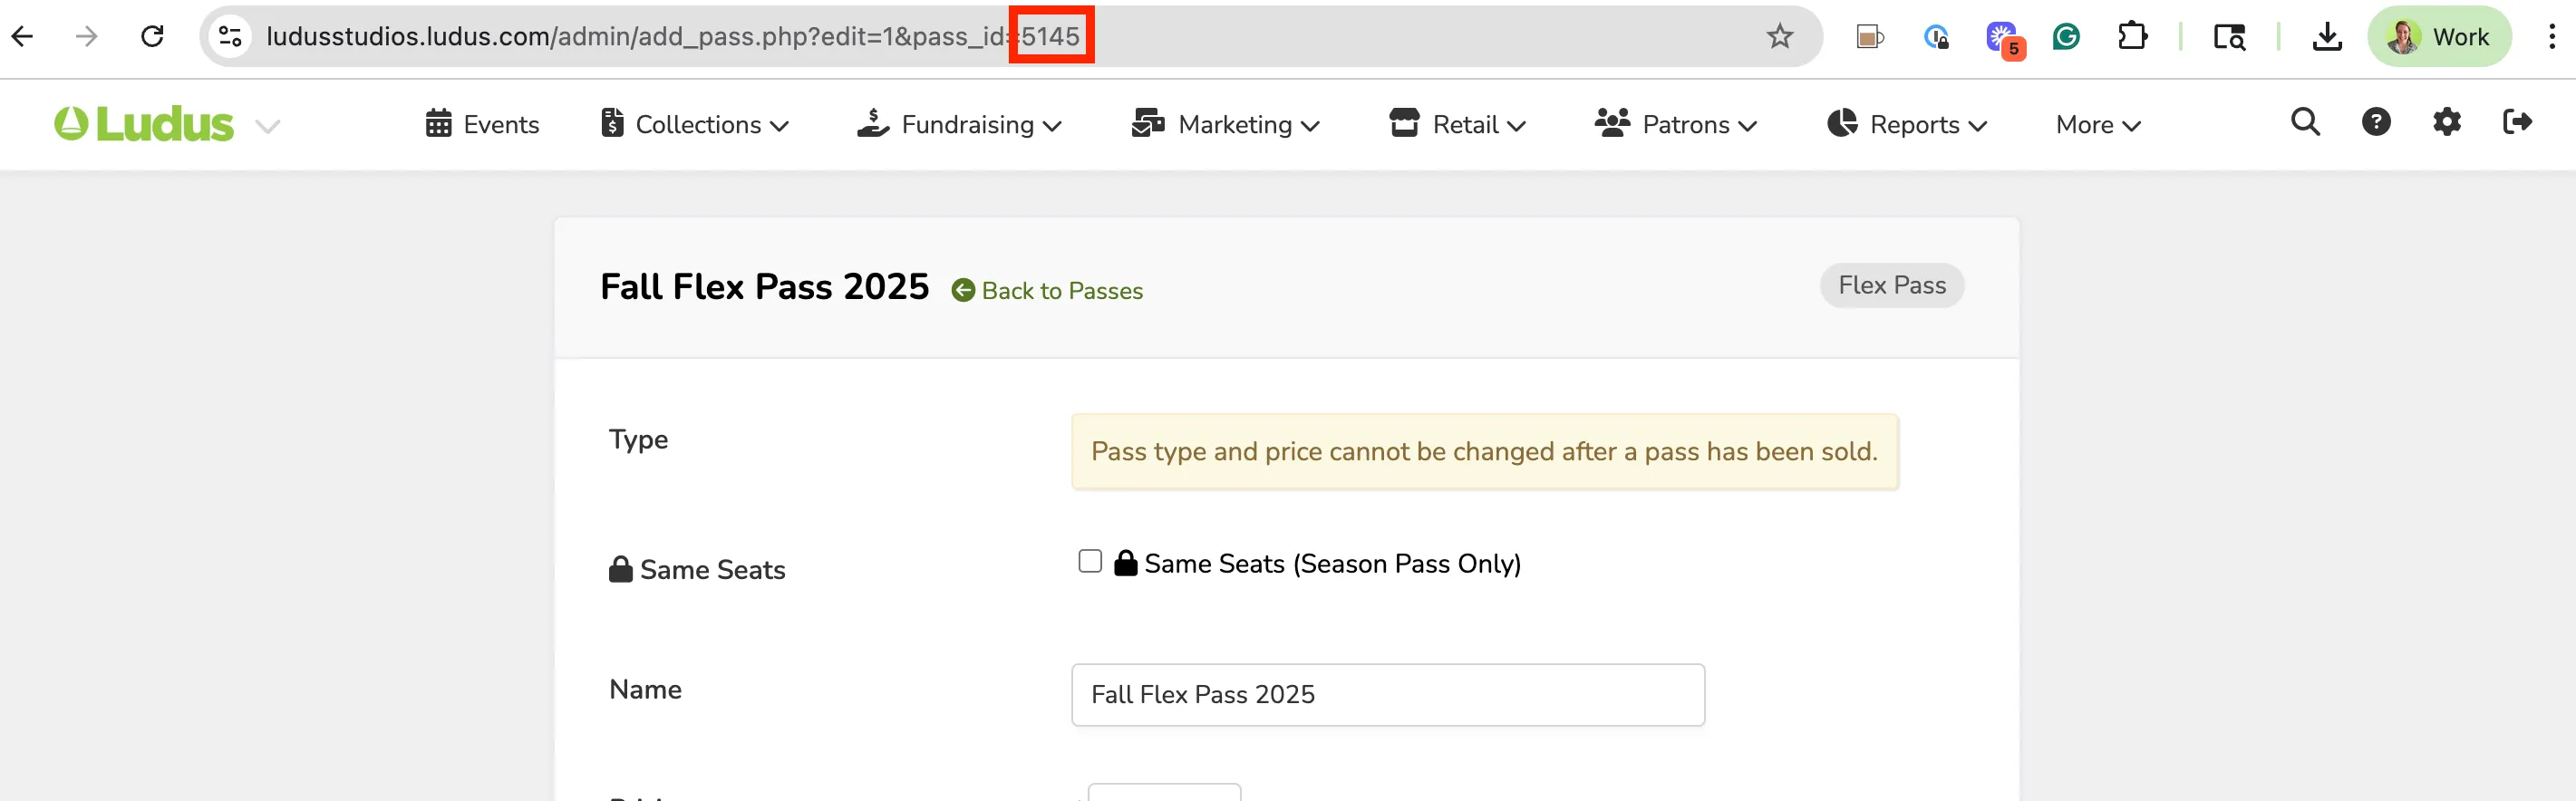
Note - IDs are unique to each pass. Two different passes (IE, Student Flex Pass vs. Senior Flex Pass) will have different IDs.
- Code (Required): The code you want to assign to the Passholder must be unique and can be letters, numbers, or a combination of both. Special characters are not allowed.
- First Name (Optional): Passholder's first name
- Last Name (Optional): Passholder's last name
- Email (Required): This assigns the pass to the patron's record
- Address (Optional): Patron Address
- Phone Number (Optional): Patron's phone number
Note - Importing passes can optionally send an email of the passcode to the recipient. Let Support know if you want the patrons emailed the pass at the time of import, or if you will later send the passes out.
See Import Properties for instructions and assistance (as well as the CSV).
See Import Prior Gift Card Sales for instructions and assistance (as well as the CSV).
See Import Prior Ticket Sales for instructions and assistance (as well as the CSV).
This applies to recurring and one-time memberships and is primarily done when importing memberships from a prior system into Ludus during onboarding.
You can import existing memberships paid for in another system with their expiration dates. 7 days before the imported memberships are set to expire, an email will be sent allowing patrons to set up a payment method to continue their membership by adding a credit card.
Set up membership passes before you import, and configure any fee settings in advance.
Before importing the membership passes, we strongly recommend emailing your patrons to let them know they will receive an email about the new membership in Ludus, so they don't think it is spam and know the links are safe.
Membership template.
The following lists all fields, including what is required and what is optional for the import.
- Pass ID (Required): Obtained from the URL of the pass
- Code (Required): The passcode you assign must be unique.
- First Name (Optional)
- Last Name (Optional)
- Address (Optional)
- Phone # (Optional): preferred formating would be (###) ###-####
- Email (Required): Patron's email address
- Expiration Date (Required): Formatted as DD-Month-YY (IE, 29-Jul-24
Volunteer hours can be imported to existing volunteer profiles. This is primarily meant for recording hours accumulated in a prior system when moving to Ludus. This import would be completed after volunteer profiles are imported or created.
CSV Sample file:
To import volunteer hours, the following fields are available:
- Email (required)
- Hours: Number of hours to apply.
- Notes: Any information to record for these hours. (Optional)
- Role ID: Associated Role ID in Ludus. (Optional)
- Volunteered Date: Date to record the hours worked on. (Optional)
- Submit Date: Date submitted. (Optional)
Note - The Role ID number can be located by clicking on the Volunteer tab and using the filter for the role you need the ID number. Once filtered, the ID number is in the URL for the page.

How to Handle Season Tickets/Passes
Season Passes are not imported. You will manually go in and "resell" the passes to those patrons.
For Season Passes, we cannot import that information. Instead, you will want to:
Import Patrons into Ludus
This can be done under Patrons -> Database -> Import (at the top).
Once patrons have been imported, you will want to build your current season passes.
Make sure your events for the passes are set up before creating the pass.
This can be accomplished under More (at the top of your account) -> Passes -> +Create Pass.
Finally, you will "sell" those passes to current passholders.
This means you will go to More (at the top of your account) -> Passes.
From here, you will "sell" the pass to the patron. You will select the events for the pass and reserve seats for them. This will need to be done for each pass.
Once you do this, you can check out and choose to comp the order if they have already paid for this season ticket.
Want to see the steps above? Check out the following video: